How to Build a REST API GUI in 4 Steps
If you need a simple and flexible REST API GUI, you’ve come to the right place.
REST APIs are incredibly useful. They allow you to interact with services and sites without scraping them. You can just access a URL, send some parameters and get a response.
But when it comes to building your apps and actually communicating with them, things can get tricky. Sometimes they won’t respond as you’d expect. It can get quite tricky to pinpoint where the issue is- with your code or the API itself.
Thus, a REST API GUI helps you to identify what exactly is going on. You have visual elements to control what information is being sent, so you can read the response.
There are quite a few options for REST API GUIs though. But if you need something simple yet powerful, often building your own GUI is the best option.
And you can do it in just 4 steps.
This might seem like overkill, but building your own REST API GUI is, in most cases, faster than picking a premade tool and learning it. With the added bonus that, without coding, you can build a tool that perfectly fits your needs.
This is what you are going to learn today:
- A one-step method to import and test endpoints for any REST API.
- How to create an app without coding.
- How to connect this UI for REST API data.
- How to build screens to send requests and output information.
- How to save requests for later use.
- How to build CRUD screens with one click.
- How to deploy your GUI for REST API data.
Let’s get started!
What is a REST API interface?
A REST API allows you to use HTTP requests to GET (read), PUT (update), POST (create) and DELETE data. Thus, it’s similar to performing CRUD operations, but instead of connecting to a database, you are connecting to an external service using URL calls.
This is one of the most fundamental techniques that developers use to connect web apps to different data sources.
A REST API UI allows you to perform all these operations visually. Thus, you don’t need to rely solely on command lines or programming languages to test or perform your operations.
Are all APIs RESTful?
There are strict requirements for RESTful APIs. REST refers to the set of rules and the architecture of your API. Thus, if your API uses a different architecture it isn’t RESTful.
Essentially, an architecture is a defined framework for sending and requesting data.
APIs can use other architectures (such as SOAP or GraphQL) or they can be using their own architecture. You might equally be dealing with WebHooks or other RESTful Web Services It’s vital to understand this if you want to generate a UI from a REST API.
This is important because most clients and applications that connect to any RESTful API rely on these standards. It is like manufacturing a data transfer cable. If you pick USB-c, you need to use a physical format and transfer data with specific protocols. Otherwise, you can’t connect to other devices.
How do I test REST API calls?
You can test REST API calls using Budibase, eliminating the need for dedicated testing tools for developer teams - like Swagger UI.
The first and simplest method is to create a free account, create a new app, then pick a REST API data source.
Next, just import your API specs using this option:
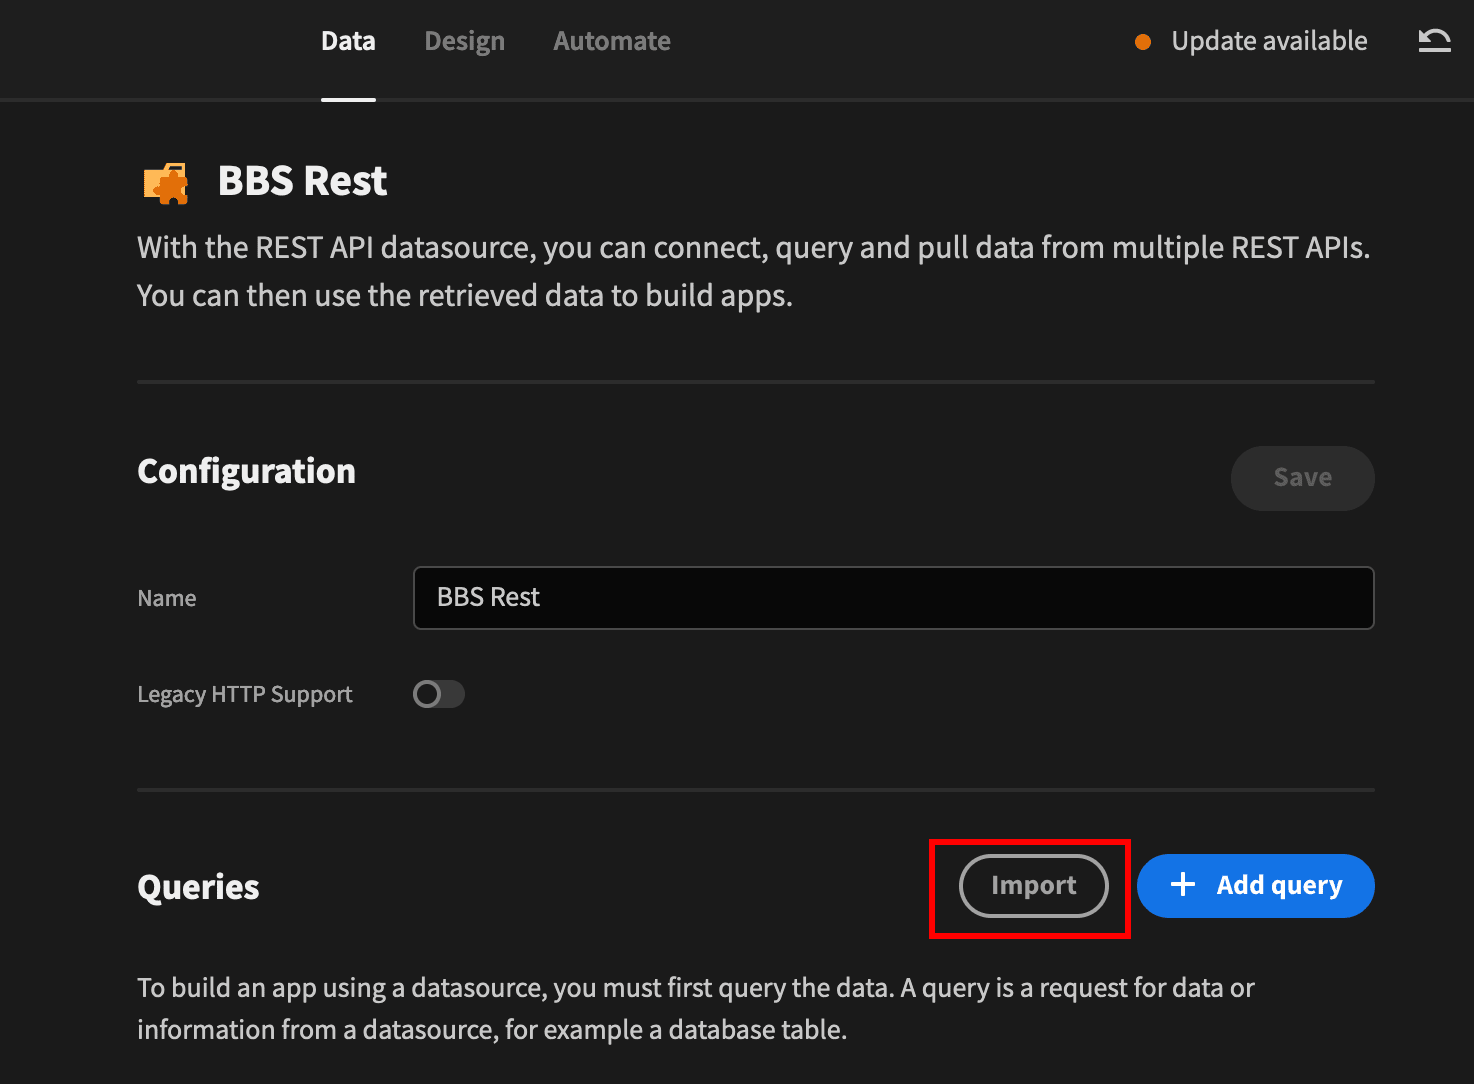
Then you can use the data source tab itself to quickly test your API calls and see the response.
Another way to do it is using a purpose-built REST API GUI. It might sound like a lot of work, but you can create a REST GUI in just 4 steps with our intuitive open-source, low-code platform.
At the end of this process, you’ll get an app with these screens:
- All Queries - List all saved queries - including basic GET, POST, PUT, and DELETE calls.
- Edit/add new
- New POST - Run new POST calls
- New GET - Run new GET calls
This is how the “all queries” screen looks:
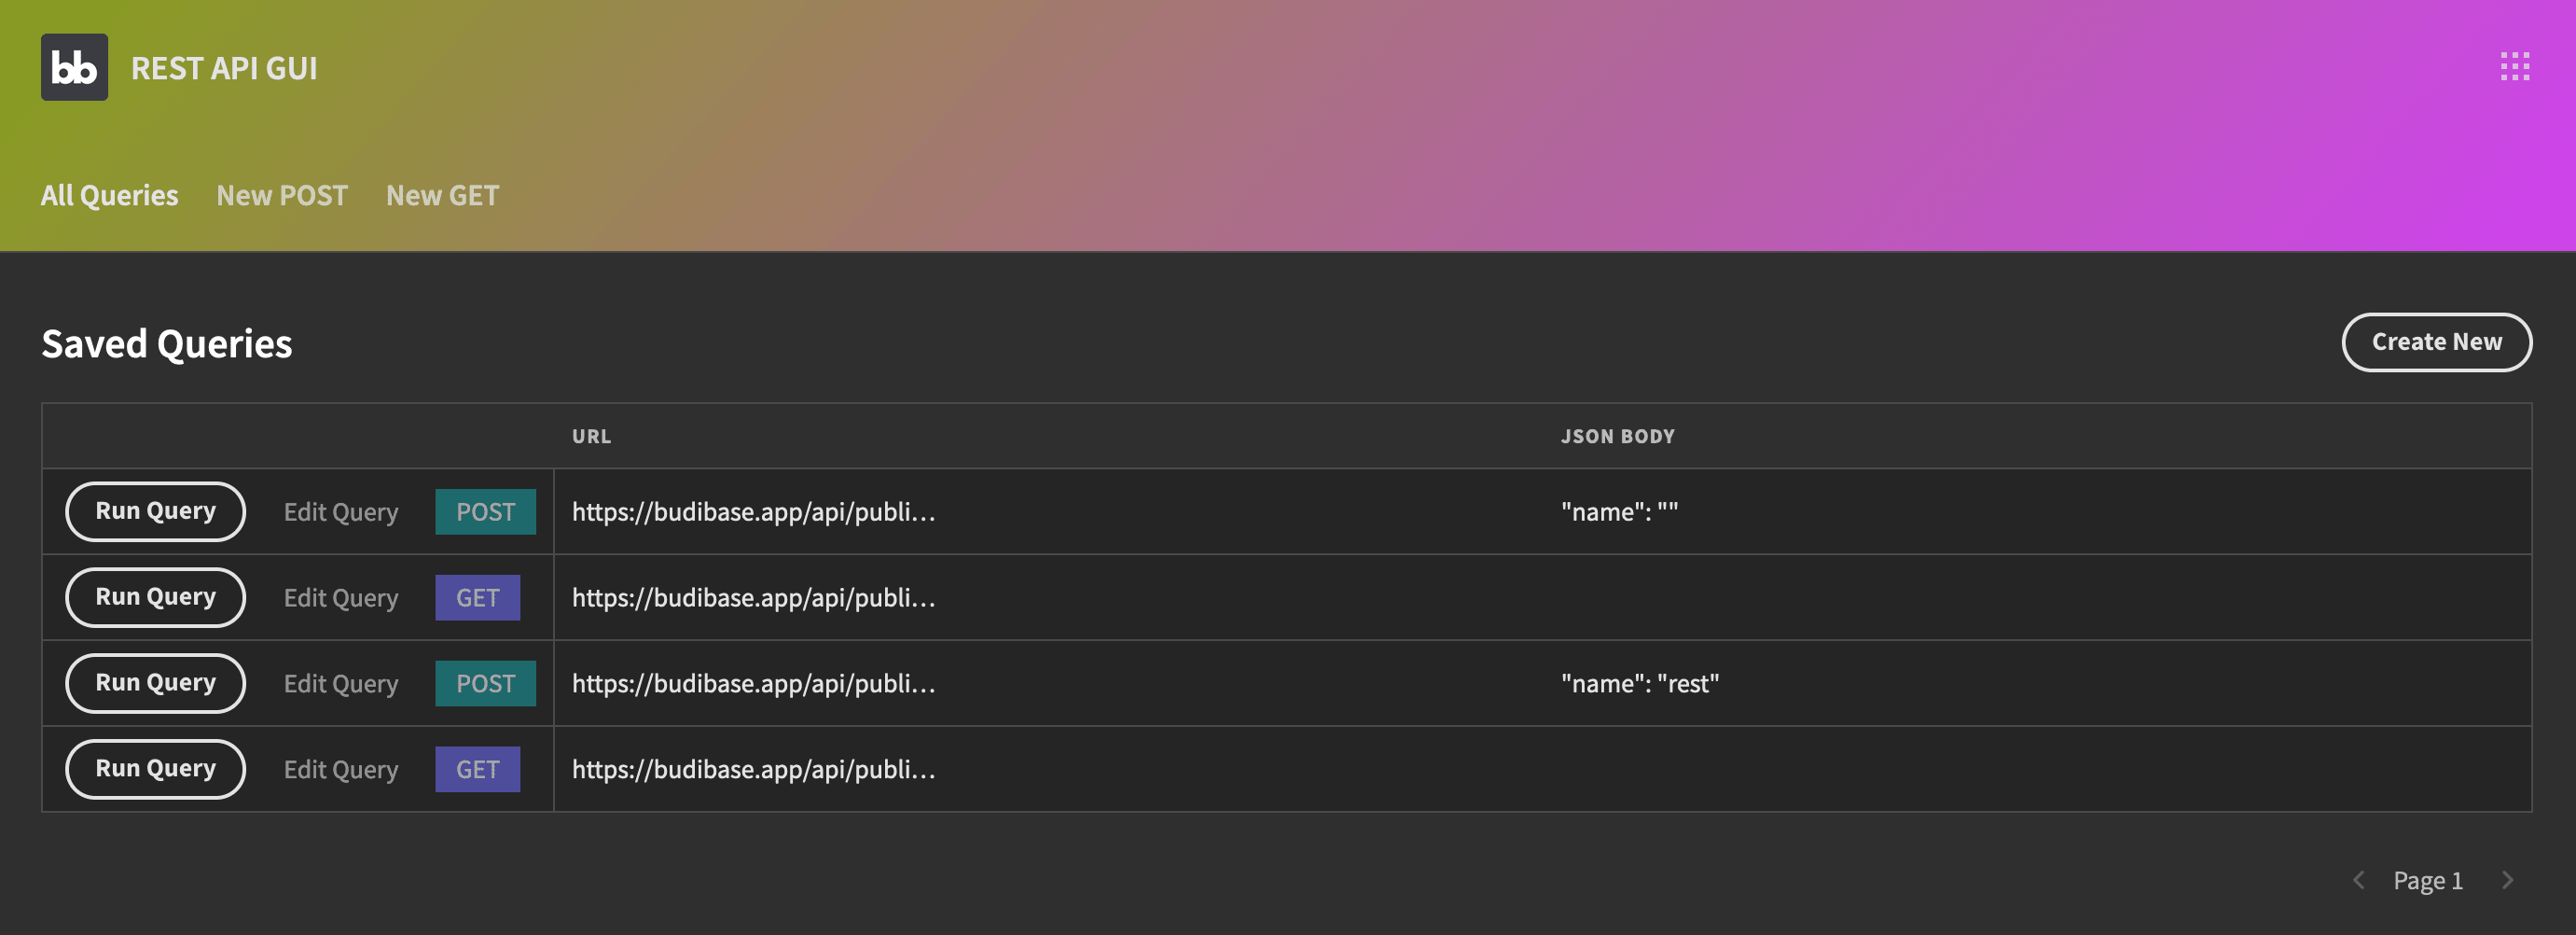
You can see the main menu at the top. Then there’s a table with the currently saved queries, along with their method, a “run query” button, and an edit button. In addition, there’s an option to add new queries there.
Both the edit and add new screens load similar forms, like this one: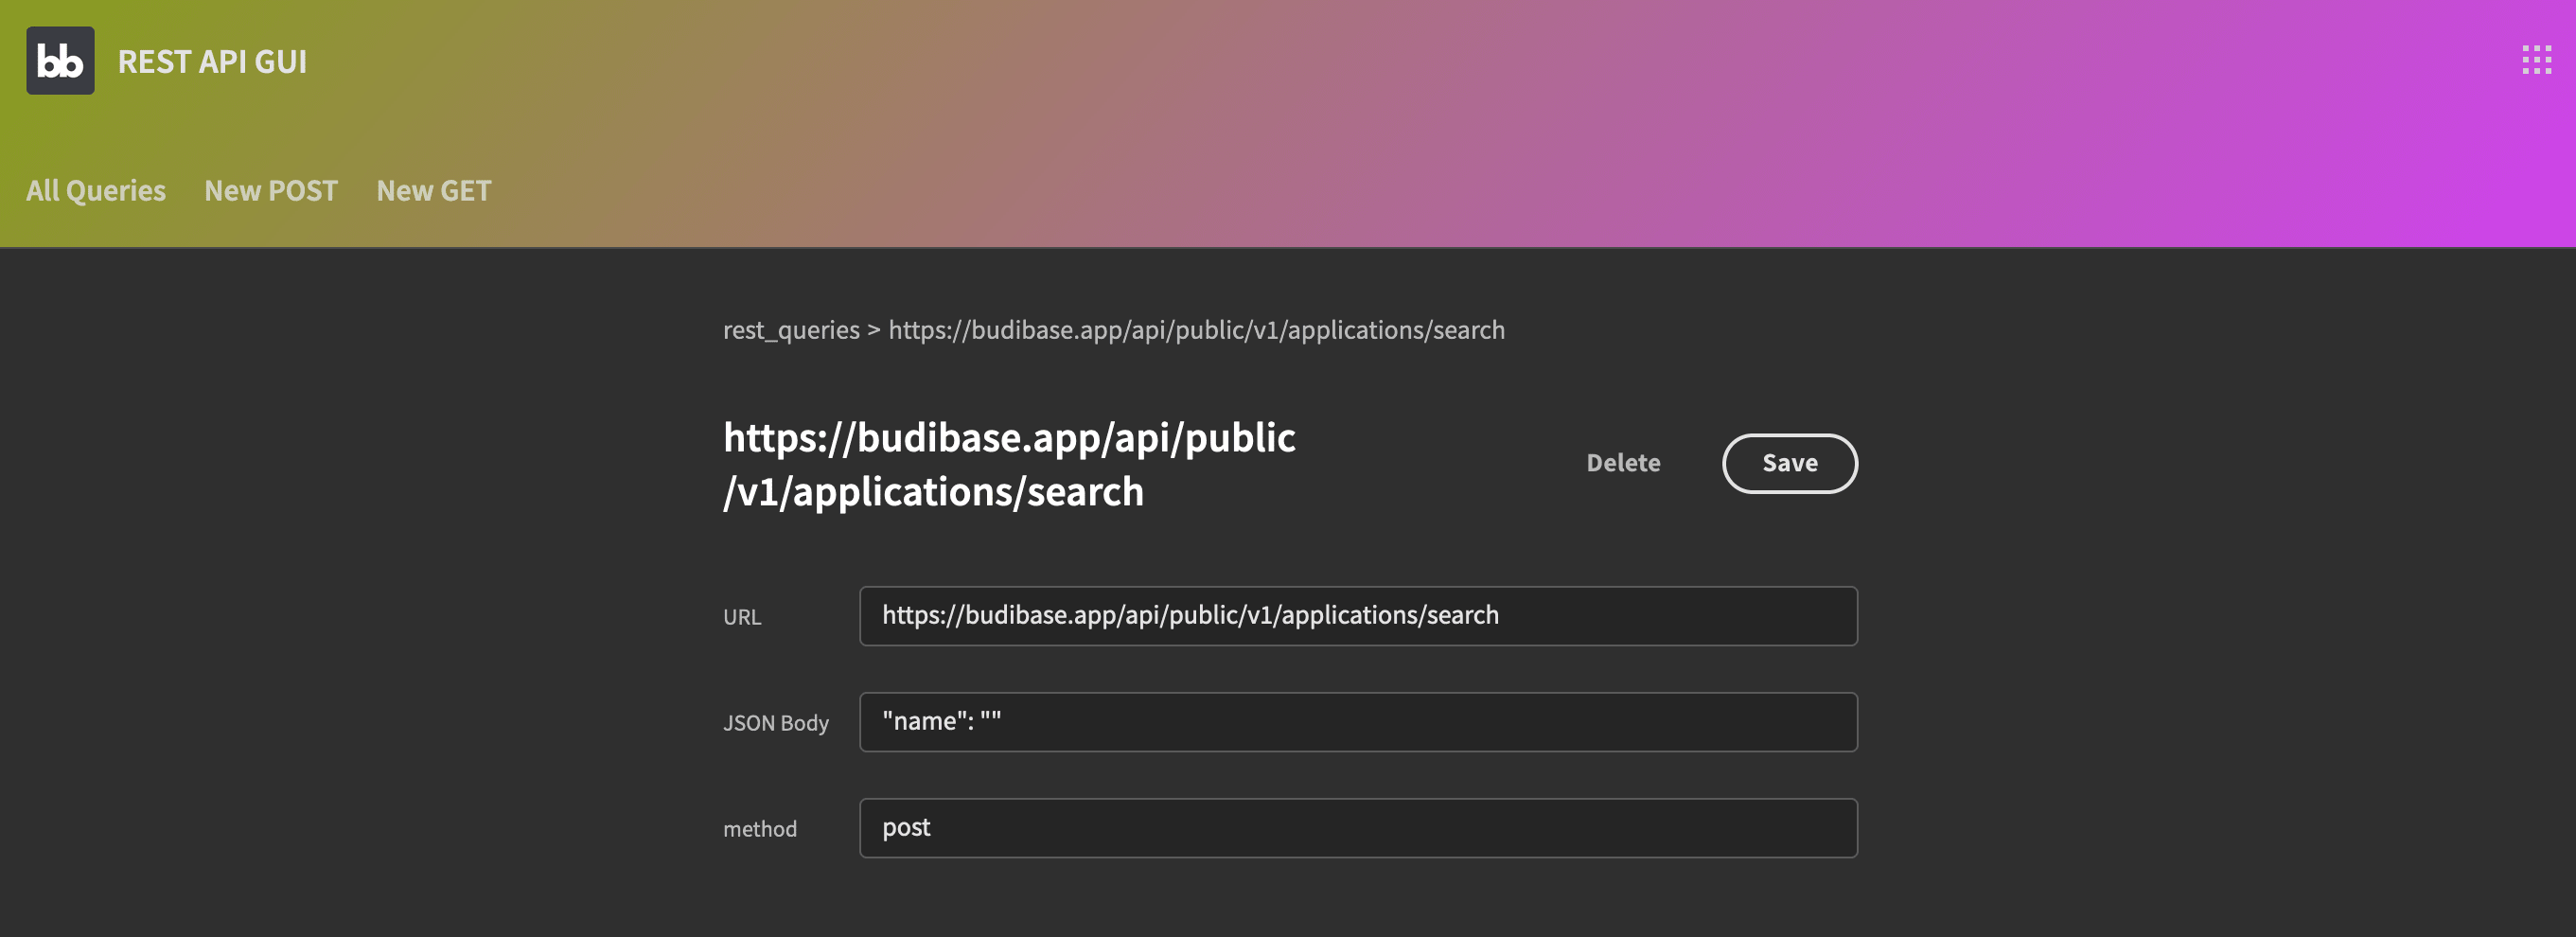
This is a form where you can edit the query, or delete it. If you click on “run query” on the previous screen, the post or get screen is loaded, depending on the query you are running.
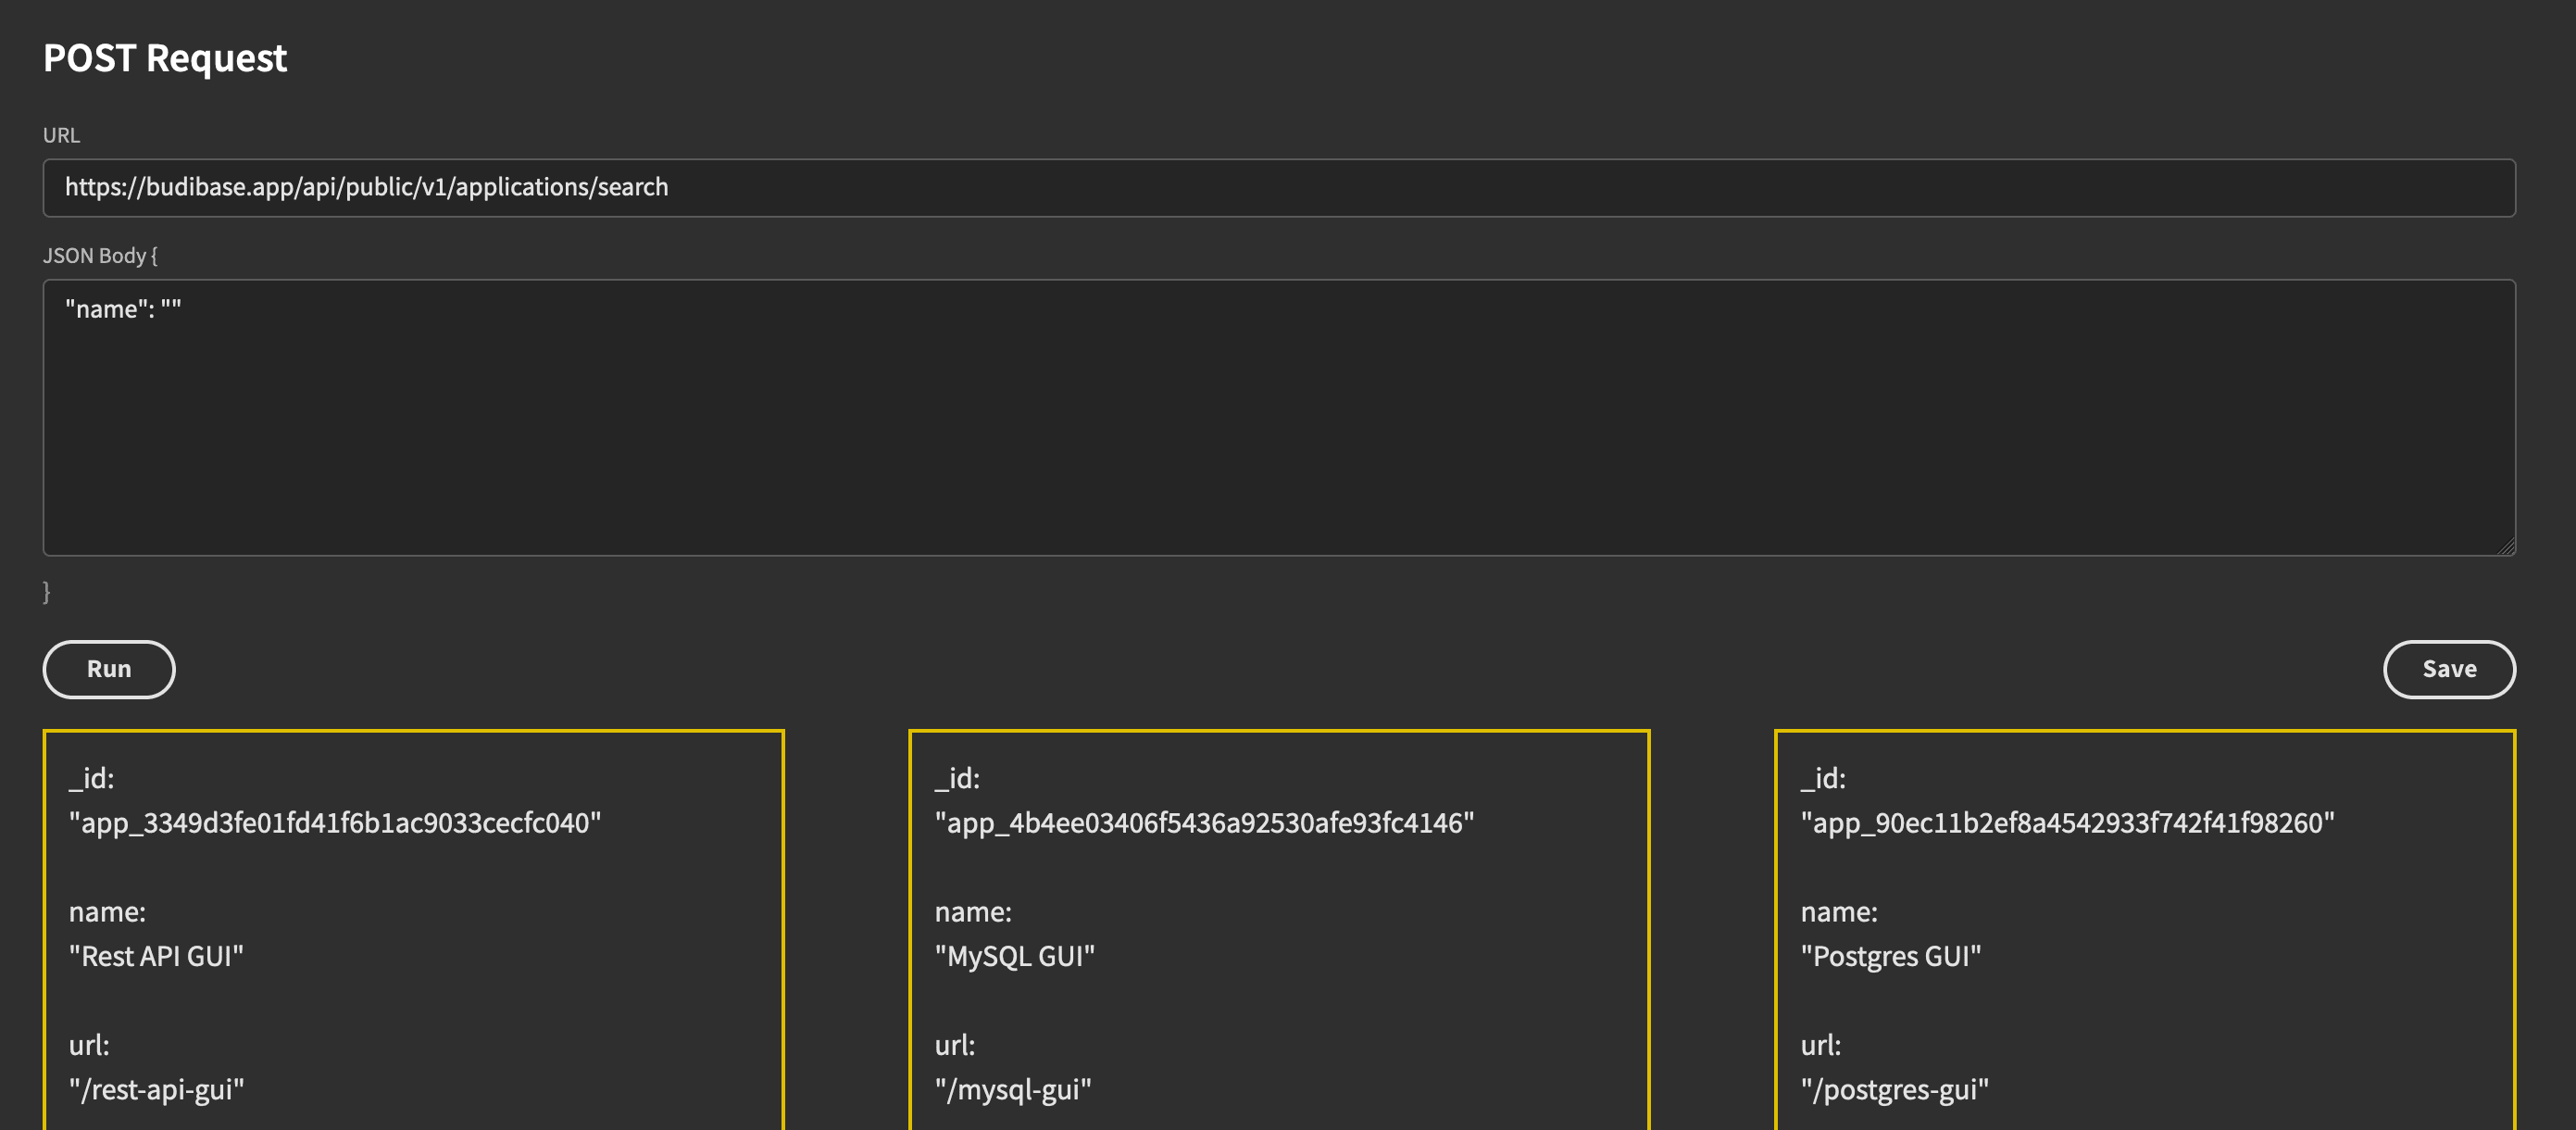
This is the POST screen. In it, you can pass the route, and your data and you’ll see the query results. In addition, you can save queries if you want to.

This is the GET screen. It is very similar to the previous one, but it doesn’t require a request body. It allows you to run GET queries and see the results as well.
Now let’s see how you can implement this app.
Step 1 - Create your app
If you haven’t already, sign up for Budibase. It’s free and it takes just a couple of seconds.
Then, create a new app, and add two data sources:
- REST API - in our case using a HTTP localhost.
- BudibaseDB
You can use the Budibase DB to quickly store metadata about your app. In our demo, we use it to store the saved queries. You could use it to manage users, add settings, or anything you want.
Create a new table called rest_queries. Then add columns for URL, JSON Body, and Method.
Next, on the REST API settings let’s add some queries. In our demo app, we are connecting to the Budibase API. It allows us to manage data about apps and users.
Two headers are used in all queries:
- Content-Type - application/JSON.
- X-budibase-api-key - your API Key. You can find it on the main Budibase page and click on your profile icon:

Since these two headers are global, you can just add them on the main Data Source page. This loads them in all of your queries.
Take a look at our in-depth guide to https://budibase.com/blog/tutorials/rest-api-authentication/ .
Now let’s create our queries. Since the actual query data is added on the front end, by your users, we just need one query for each of the methods you use. In our demo we just use GET and POST, so we need two queries.
If you have other methods in your app, you can add more queries there.
To make these queries flexible, you need to rely on bindings. With bindings, the query data is replaced with whatever your screens use when loading that query.
This is what the POST query looks like:
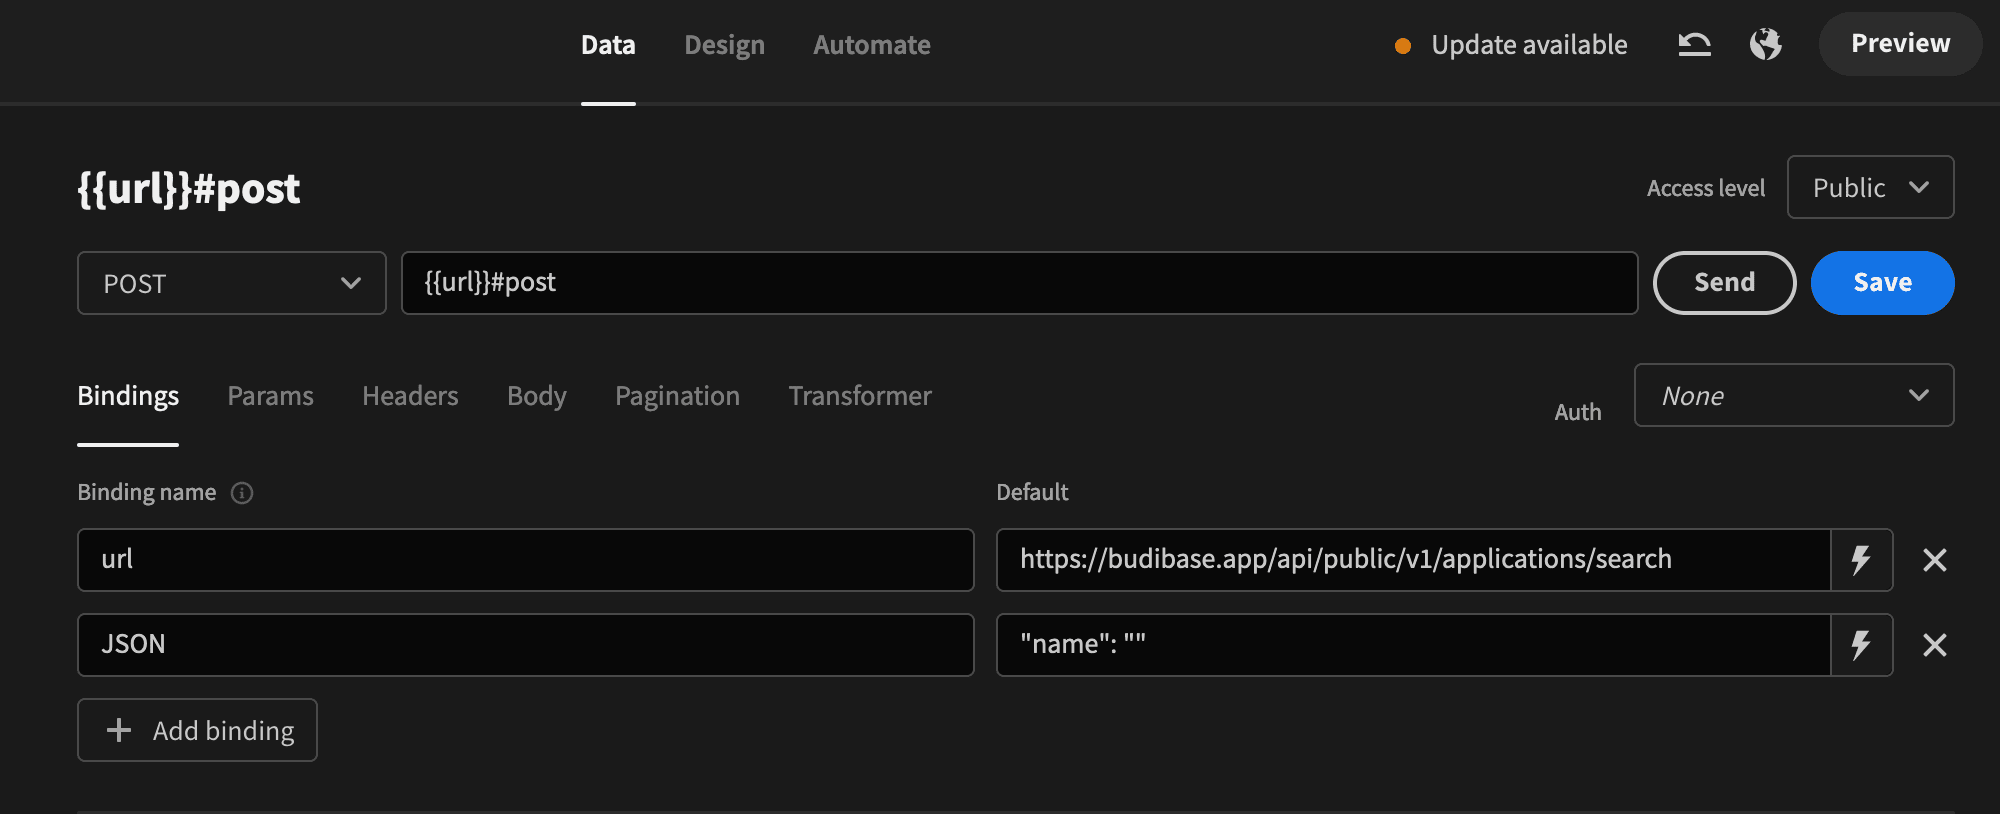
Notice how you are using a URL binding and a JSON body binding. Also, the actual request URL looks like this: {{ url }}#post. Thus, if you add example.com/, the processed URL is example.com/#post
This is just a small quality-of-life change so that you know which query you are working with on your screens. You could use different binding names for each if you want to. For example, urlPOST, and urlGET.
Don’t forget to use the JSON body binding on the “Body” tab for the post request. Set the body as raw (JSON) and use this code:
1{
2{{ Binding.JSON }}
3}
Also in this particular API, the return data is inside a “data” variable. You can make your life easier by using this transformer:
1return data["data"]With it, you can use the API output directly in your components such as tables and repeaters.
Use the send button to test the call and save it.
The default call is search apps, using the /api/public/v1/applications/search route.
Once this call is working, copy it, and replace POST with GET. Remove the JSON binding and the JSON body. You should get something like this:
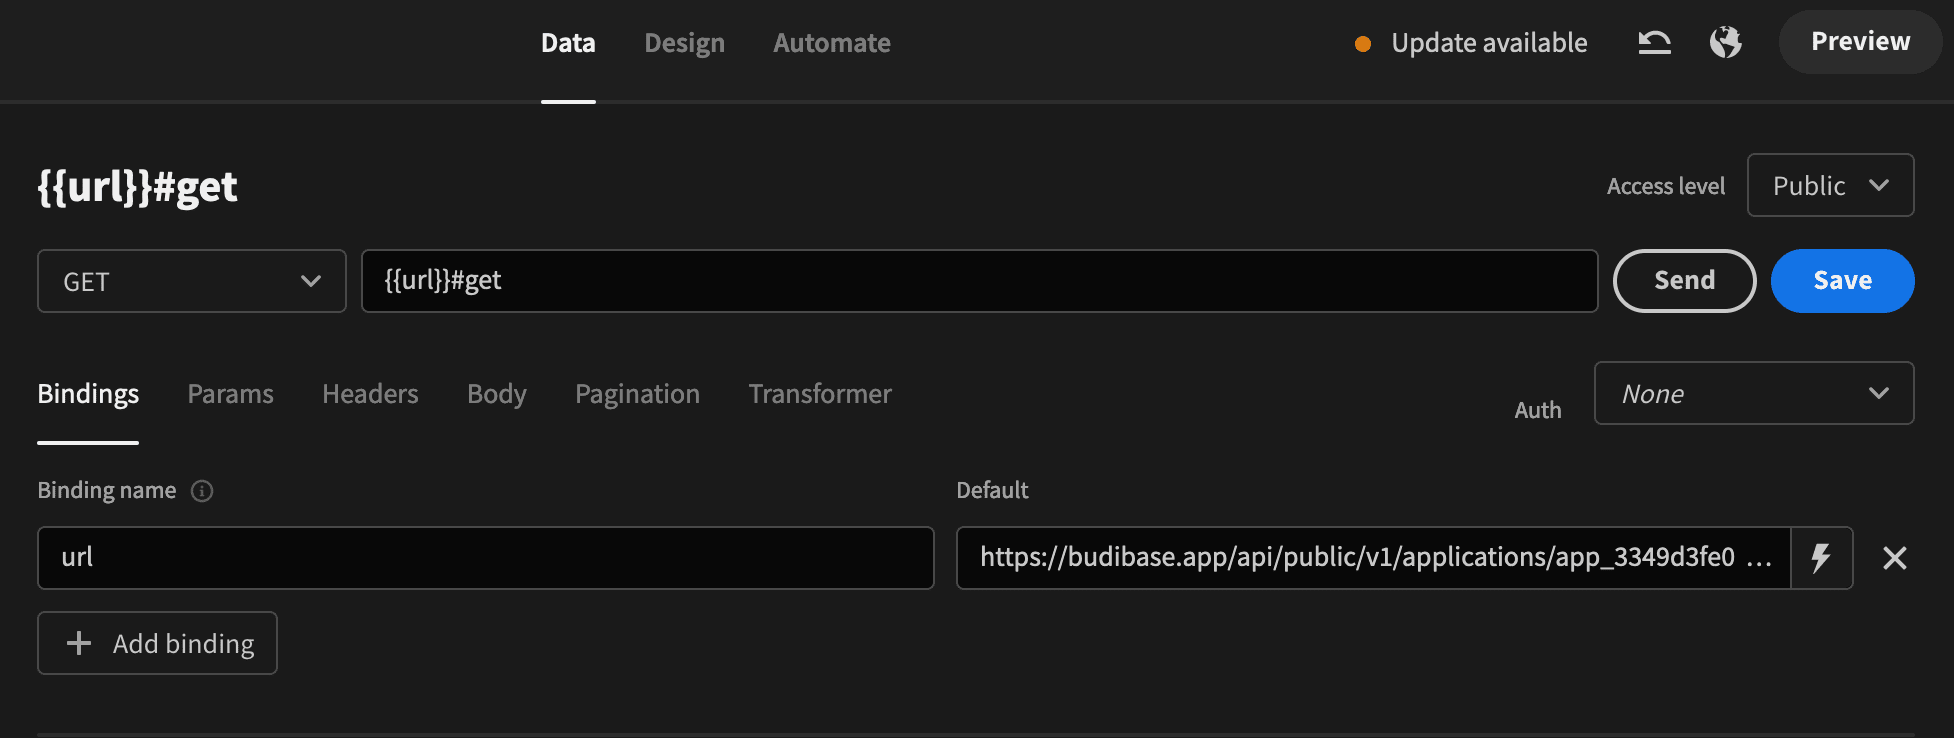
In this case, we are testing it with this route:
budibase.app/api/public/v1/applications/[add_id]
This is a GET request to load a specific app. Don’t forget to replace [app_id] with a valid app id so you can test it out. Save this query.
You can edit other global settings for your app as well before building your screens. For example, you can head over to Design > Theme and pick a dark theme, or add a background color to your header.
Now let’s create your app screens.
Step 2 - Create the query management pages
The core goal of your REST API GUI app is to run custom queries and save them. But creating a screen to load saved queries is incredibly simple. Budibase offers a drag-and-drop interface and a vast array of built-in components as the building blocks of your UIs.
Just go to Design > Screens > Add Screen. Select the “Autogenerated screens” option. Pick the rest_queries table.
You’ll get three news screens when you pick this option:
- rest_queries - This screen loads a table so you can see your queries along with a “view” button
- rest_queries/:id - When you click on “view” you can see this form, to edit data or delete an item
- rest_queries/new/row - This is quite similar to the previous form, but to create new items
You will notice that the rest_queries screen is a bit different from the demo app. You can edit this screen in any way you want to better suit your REST API GUI.
Now compare the element tree you have right now, with the elements tree from the demo app:
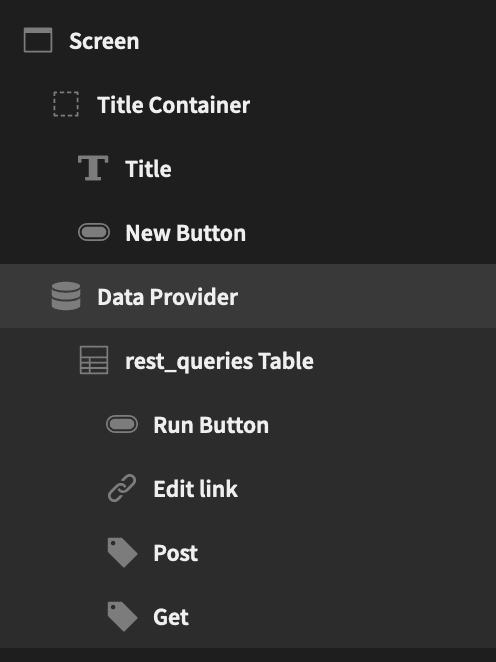
The main difference is in the rest_queries Table.
First, there’s the “Run query” button. With the table selected, create a new button component. Then open up its “onclick” actions:
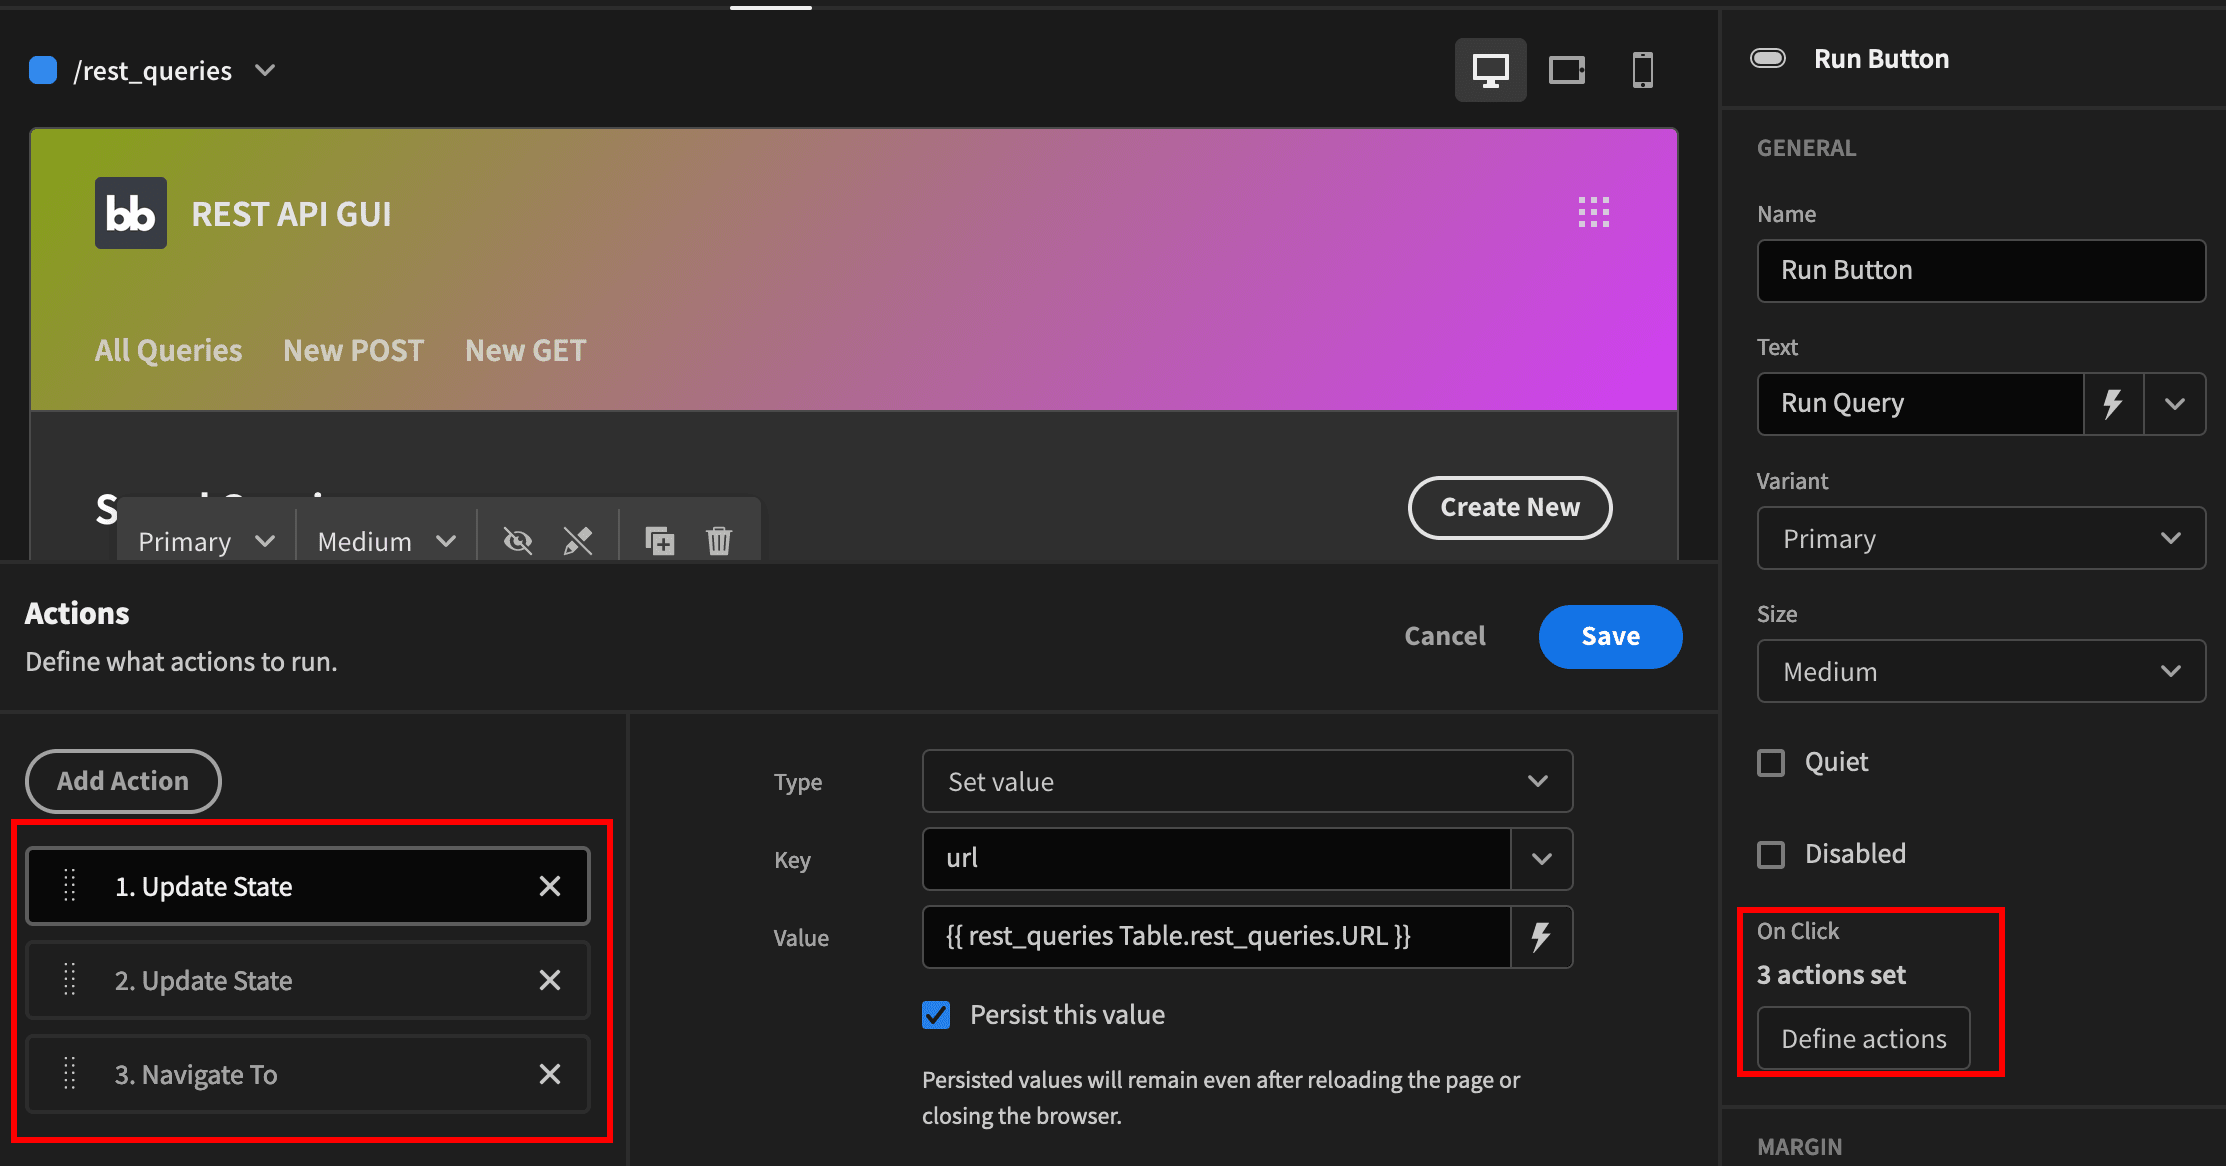
This button has three actions:
Update State:
- Set value
- Key: url
- Value: {{ rest_queries Table.rest_queries.URL }}
- Persist value
Update State:
- Set value
- Key: json
- Value: {{ rest_queries Table.rest_queries.JSON Body }}
- Persist value
Navigate to page:
- URL: /{{ rest_queries Table.rest_queries.method }}
With these actions, when you click on “run query”, you are going to save two variables, and then navigate to /post or /get, depending on the current row.
If you want, you can use different variables for urlget and urlpost. That would prevent the app from loading a GET URL when you visit the POST page and vice versa. In this case, you’ll need a different onclick logic using conditionals, which we won’t cover here.
Moving on, the edit link is just the view link with a different name. Feel free to edit that component if you want.
Lastly, there are the “post” and “get” tags. You can create them by adding both tag components to all rows. Then use the display conditions to show only the correct tag, like this:
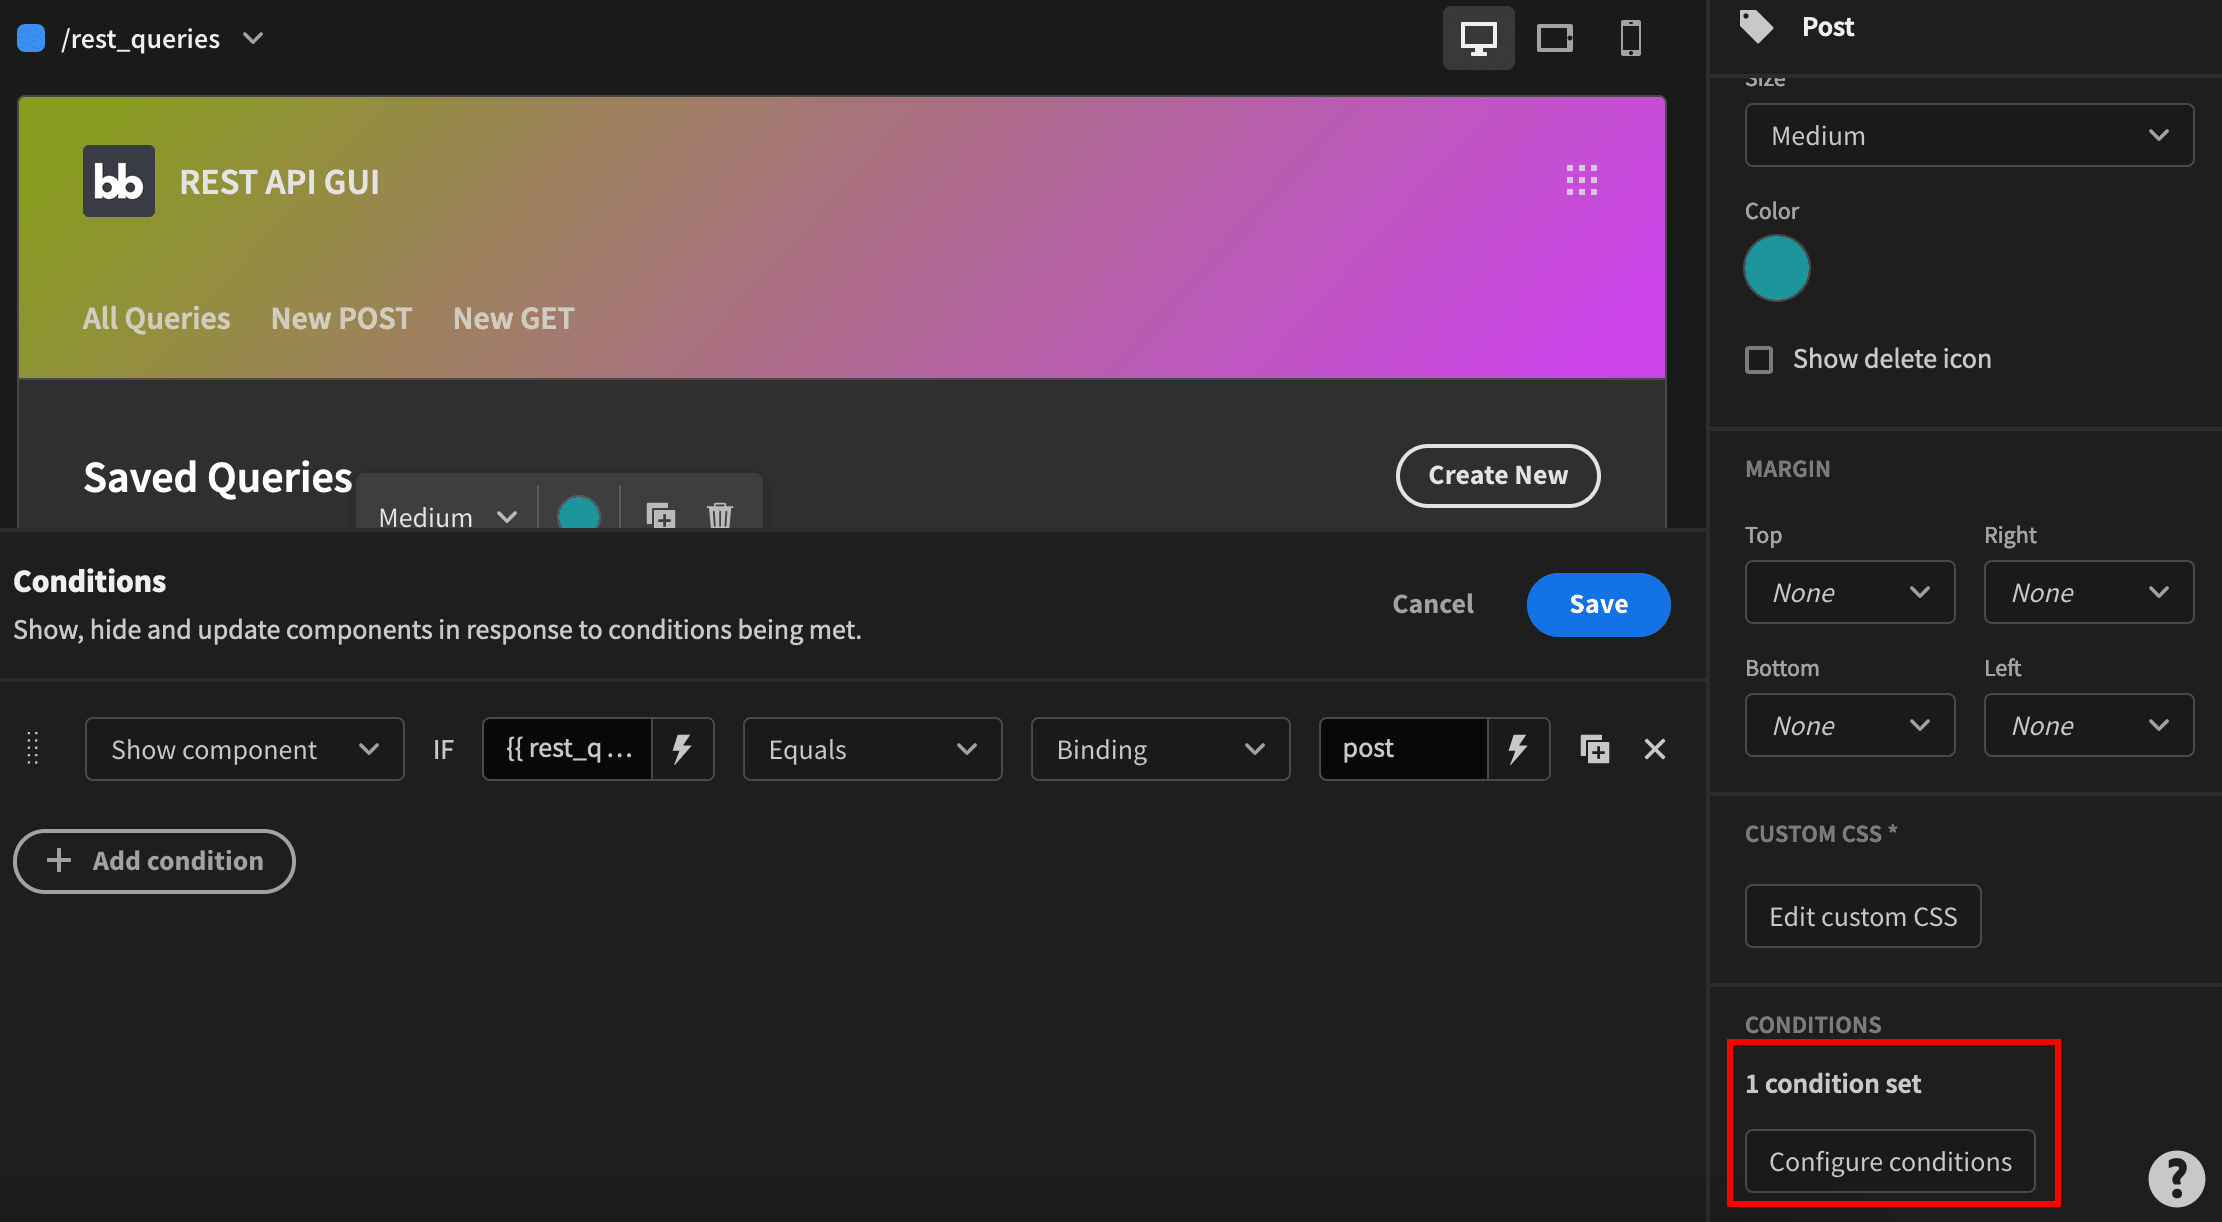
You can use these conditions:
- POST: Show if {{ rest_queries Table.rest_queries.method }} equals to post
- GET: Show if {{ rest_queries Table.rest_queries.method }} equals to get
That’s all for the home screen. Let’s create the POST calls screen.
Step 3 - POST calls screen
Create a new screen with the /post route. The overall logic for this page is to load the {{ url }}#post query using bindings from the variables. This allows you to load data when users click on the saved queries table. But it allows you to set this variable on that page as well.
This is the elements tree:
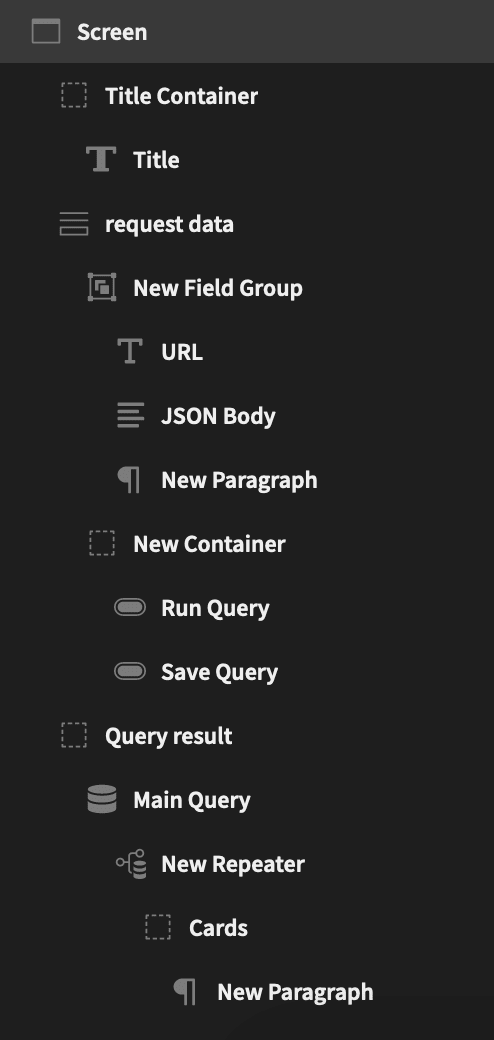
Create the title container with a title component. There are no big surprises on these components, just use some text to show a title on your page.
Then, create a new form component. All form items need a form component as their parent. You can use a custom schema, then add the form fields components.
The text input for the URL is a simple text field, like this:
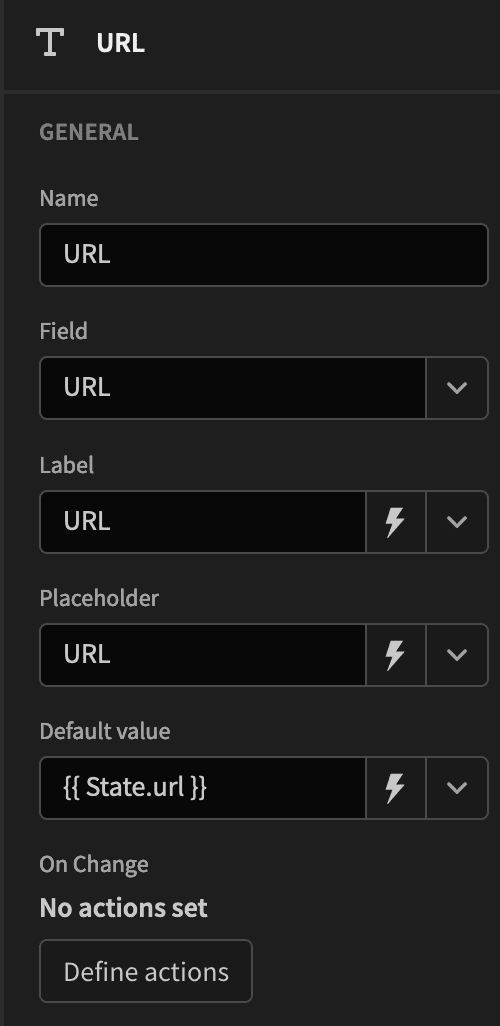
Notice how we load the default value from the {{ State.url }} data. This pre-populates this field with whatever URL you have saved in your app, coming from this page or the homepage.
Moving on, there’s the JSON Body multi-line component:
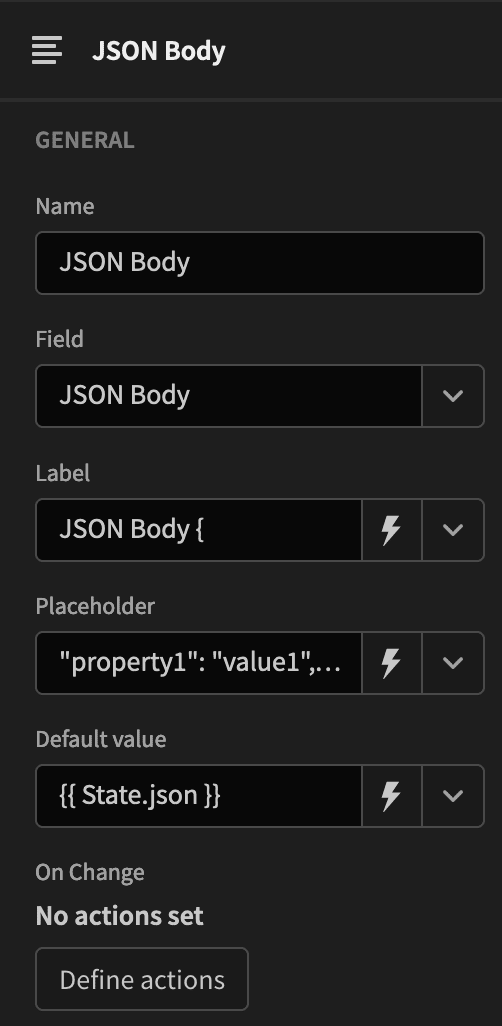
In this component, you can steer users on how they should add their data. It is done using the { bracket on the label, and a placeholder with just the JSON properties.
Then add a paragraph to close the bracket “}”.
The “run” and “save” buttons are inside a container with these properties so that they are in a single line:
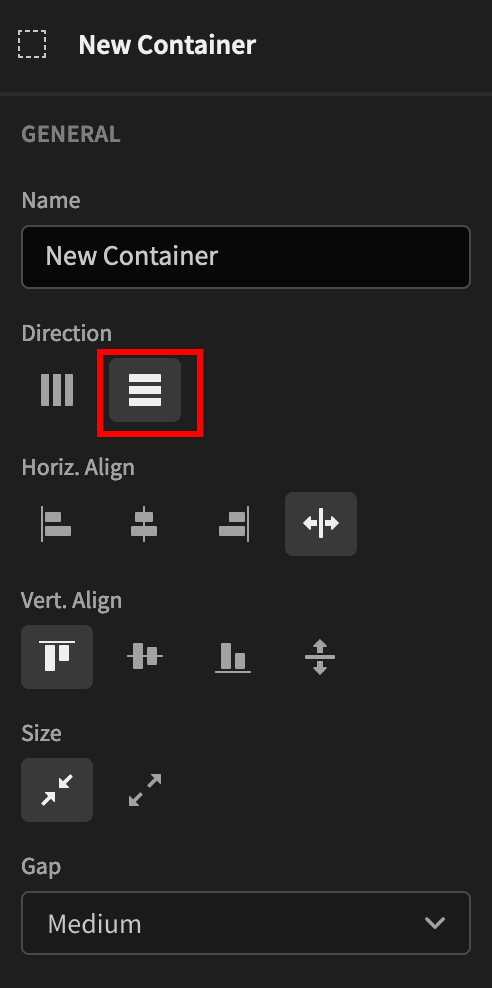
The “run” button is the exact same button you have inside the rest_queries table. But it won’t navigate to a page, and the bindings are based on the form components, not the table components. So:
- Update state > Set value > url: {{ request data.Fields.URL }}
- Update state > Set value > json: {{ request data.Fields.JSON Body }}
The “save” button runs the “Save row” action with these options:
- Datasource: none
- Table: rest_queries
- URL: {{ request data.Fields.URL }}
- JSON Body: {{ request data.Fields.JSON Body }}
- Method: post
Now you just need to display your data.
Create the component for the query result container and a data provider. You can use these bindings in it:
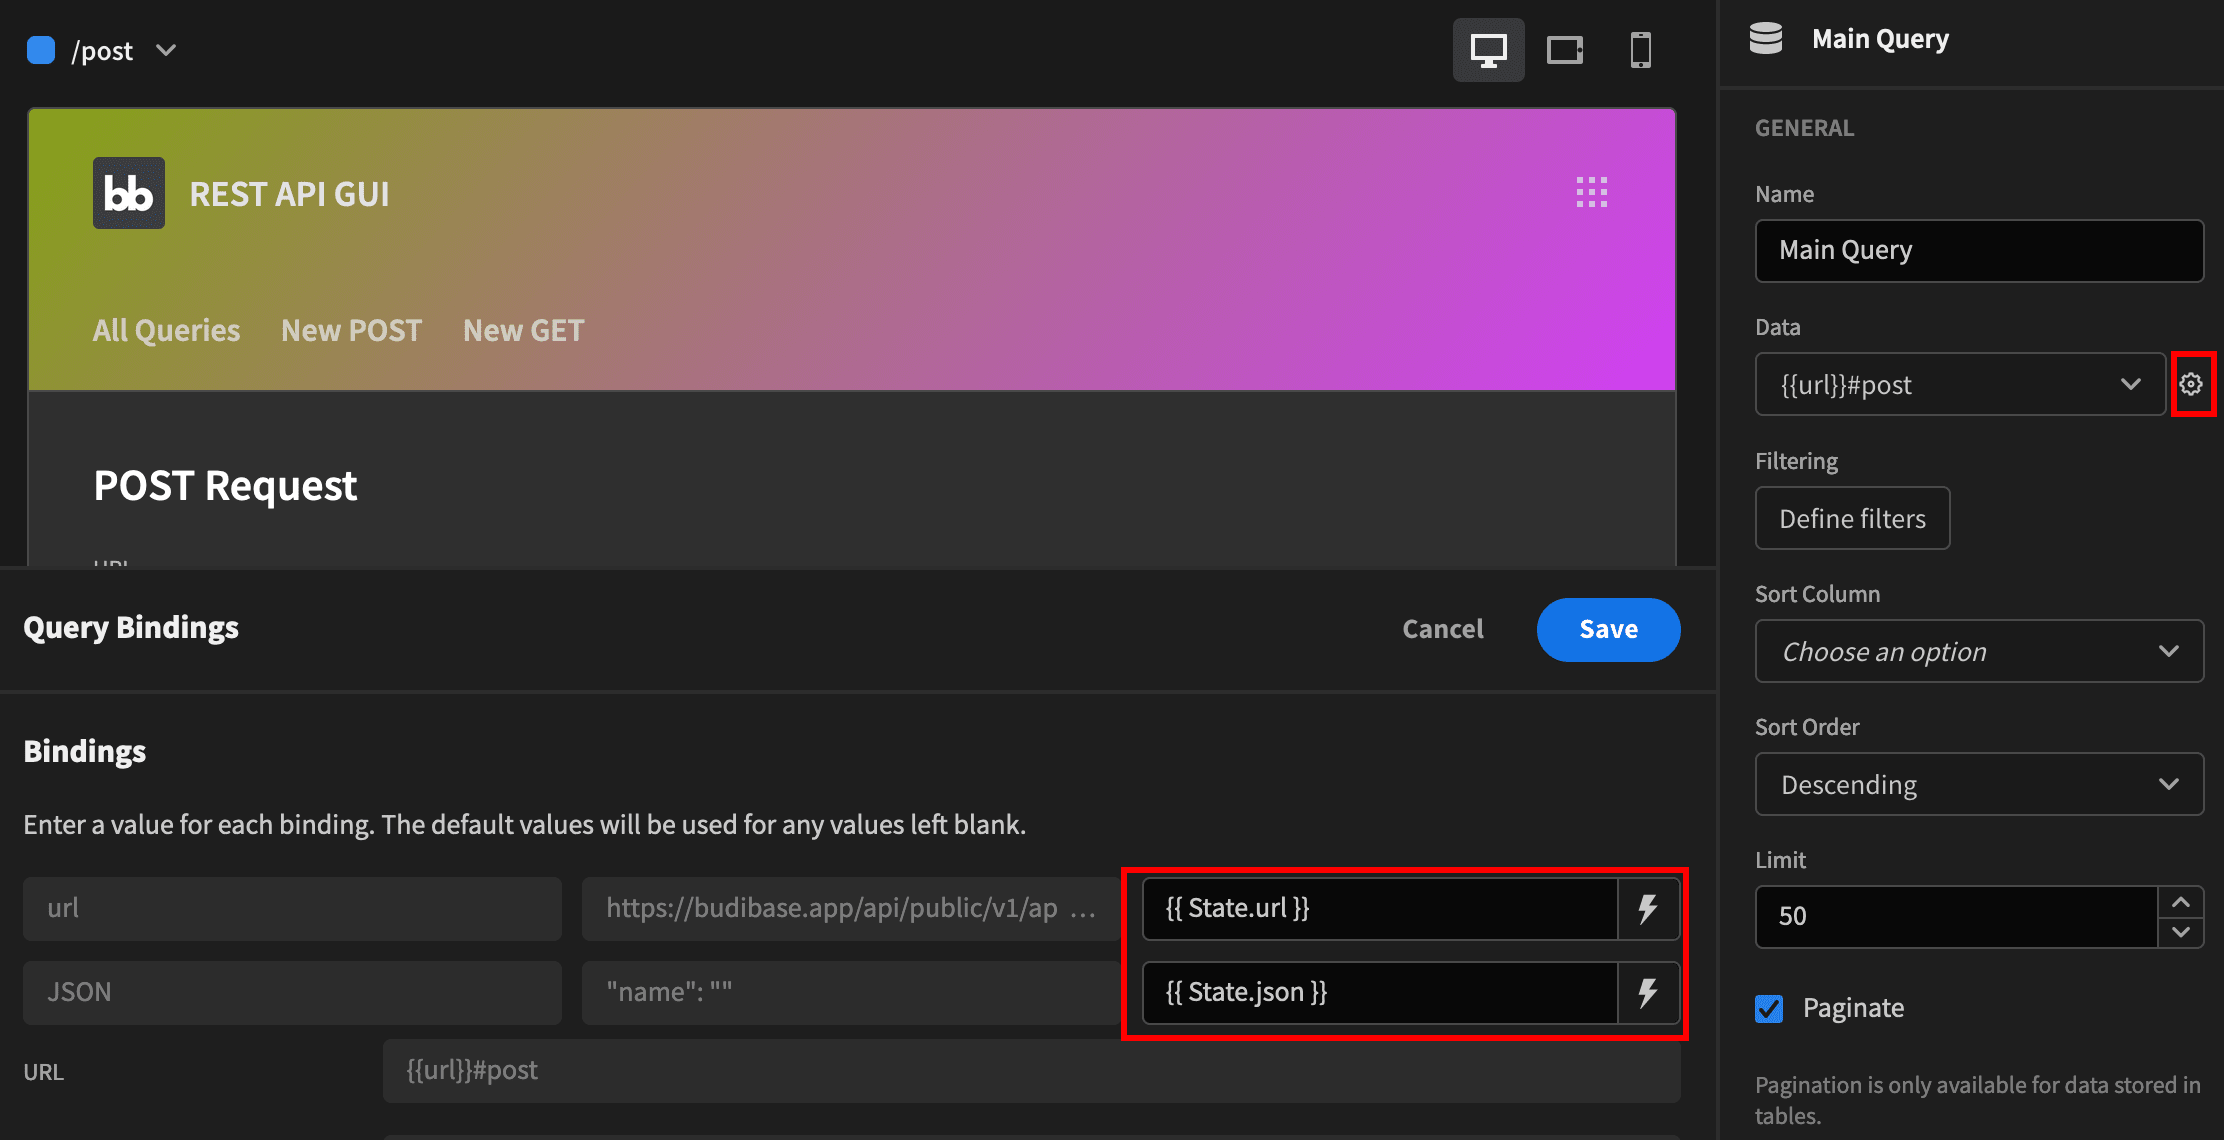
Notice how the #post in the query name is useful now. Otherwise, you’d have two queries with the same name.
Then pass the bindings from the app state, this allows the data source to always load whatever your REST API GUI is telling it to.
Once you load data using a data provider, it is loaded as an array. You can access this data with a couple of different methods:
- Directly, using bindings or JS code.
- Using a repeater.
- Using a table (like we did in the rest_queries CRUD screen).
- Using cards.
- Using charts.
A table isn’t the best option, since you don’t have a fixed schema. Each request can have a different number of columns with different data types.
Cards have preset fields. They work well in just a few fields, but we need more.
Thus, in this case, you can use a repeater and create your own output. Create a repeater and use the horizontal direction, just like you did for the buttons container.
Then create the cards container to hold the output. You can set it with width: 30% in case you want items to side by side. You can set borders and other styling options as well if you want.
The paragraph component contains this JS code:
1var row = $("New Repeater.Row Index");
2row = $("Main Query.Rows")[row];
3var ret = "";
4Object.entries(row).forEach(([key, val]) => {
5ret += "" + key + ":\n";
6ret += JSON.stringify(val, null, "\t");
7ret += "\n\n";
8});
9return ret;
This function gets the current row index (a number), then loads a variable from the data provider array with the entire row. Next, for each of the row properties, you display the key and a string representation of the value (in case you have elements inside an element).
That’s it, the POST screen of your REST API GUI is ready.
Step 4 - GET calls screen
You can duplicate the POST screen, and use the /get route for the new page.
It is quite similar to the previous screen, this is its elements tree:
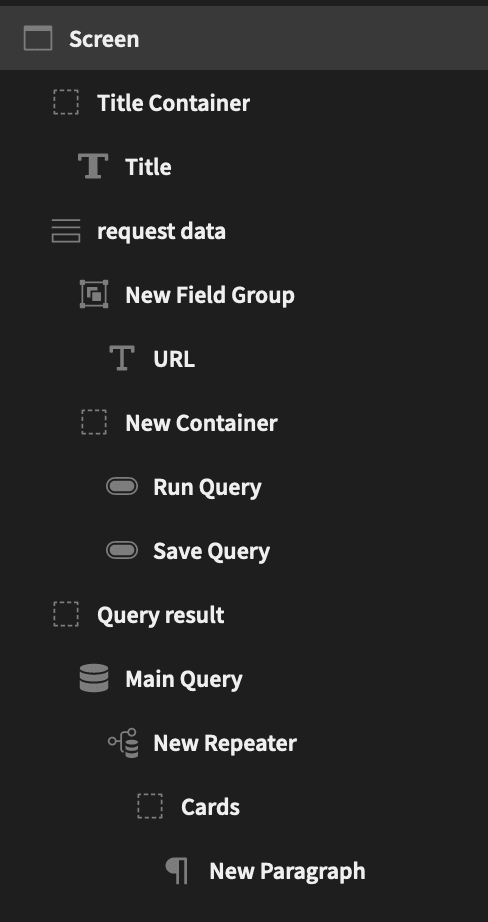
You just need to update a few items on this page:
- Update the data provider, from #post to #get.
- Remove the JSON body field.
- Update the “Save” button, so it sends an empty JSON body and the “get” method.
- Update the page title.
That’s it!
You can follow this method and create other screens if you want. You can have all the REST methods by just copying these base screens.
How to build a REST API GUI with Budibase
REST APIs and web app development are basically inseparable.
Today we looked into how you can create your own REST API GUI in just 4 steps. You saw how you can use Budibase to import and test REST API calls. Then you learned how you can create an app, and connect to a REST API using flexible calls based on user inputs.
Lastly, you saw how you can bring it all together on screens to save queries, run them and use different REST API screens for each method.
We hope you enjoyed it, and see you again next time!
Check out our in-depth guide to building database GUIs for more inspiration.